
Baking season is upon us, and since I get lots of questions about pie, I decided to share my tips for baking mini pies using a muffin tin. Of course some of these tips can be applied to making standard pies. I will call them out.
This was my third time making mini pies from a muffin tin, and each time I have gotten better.
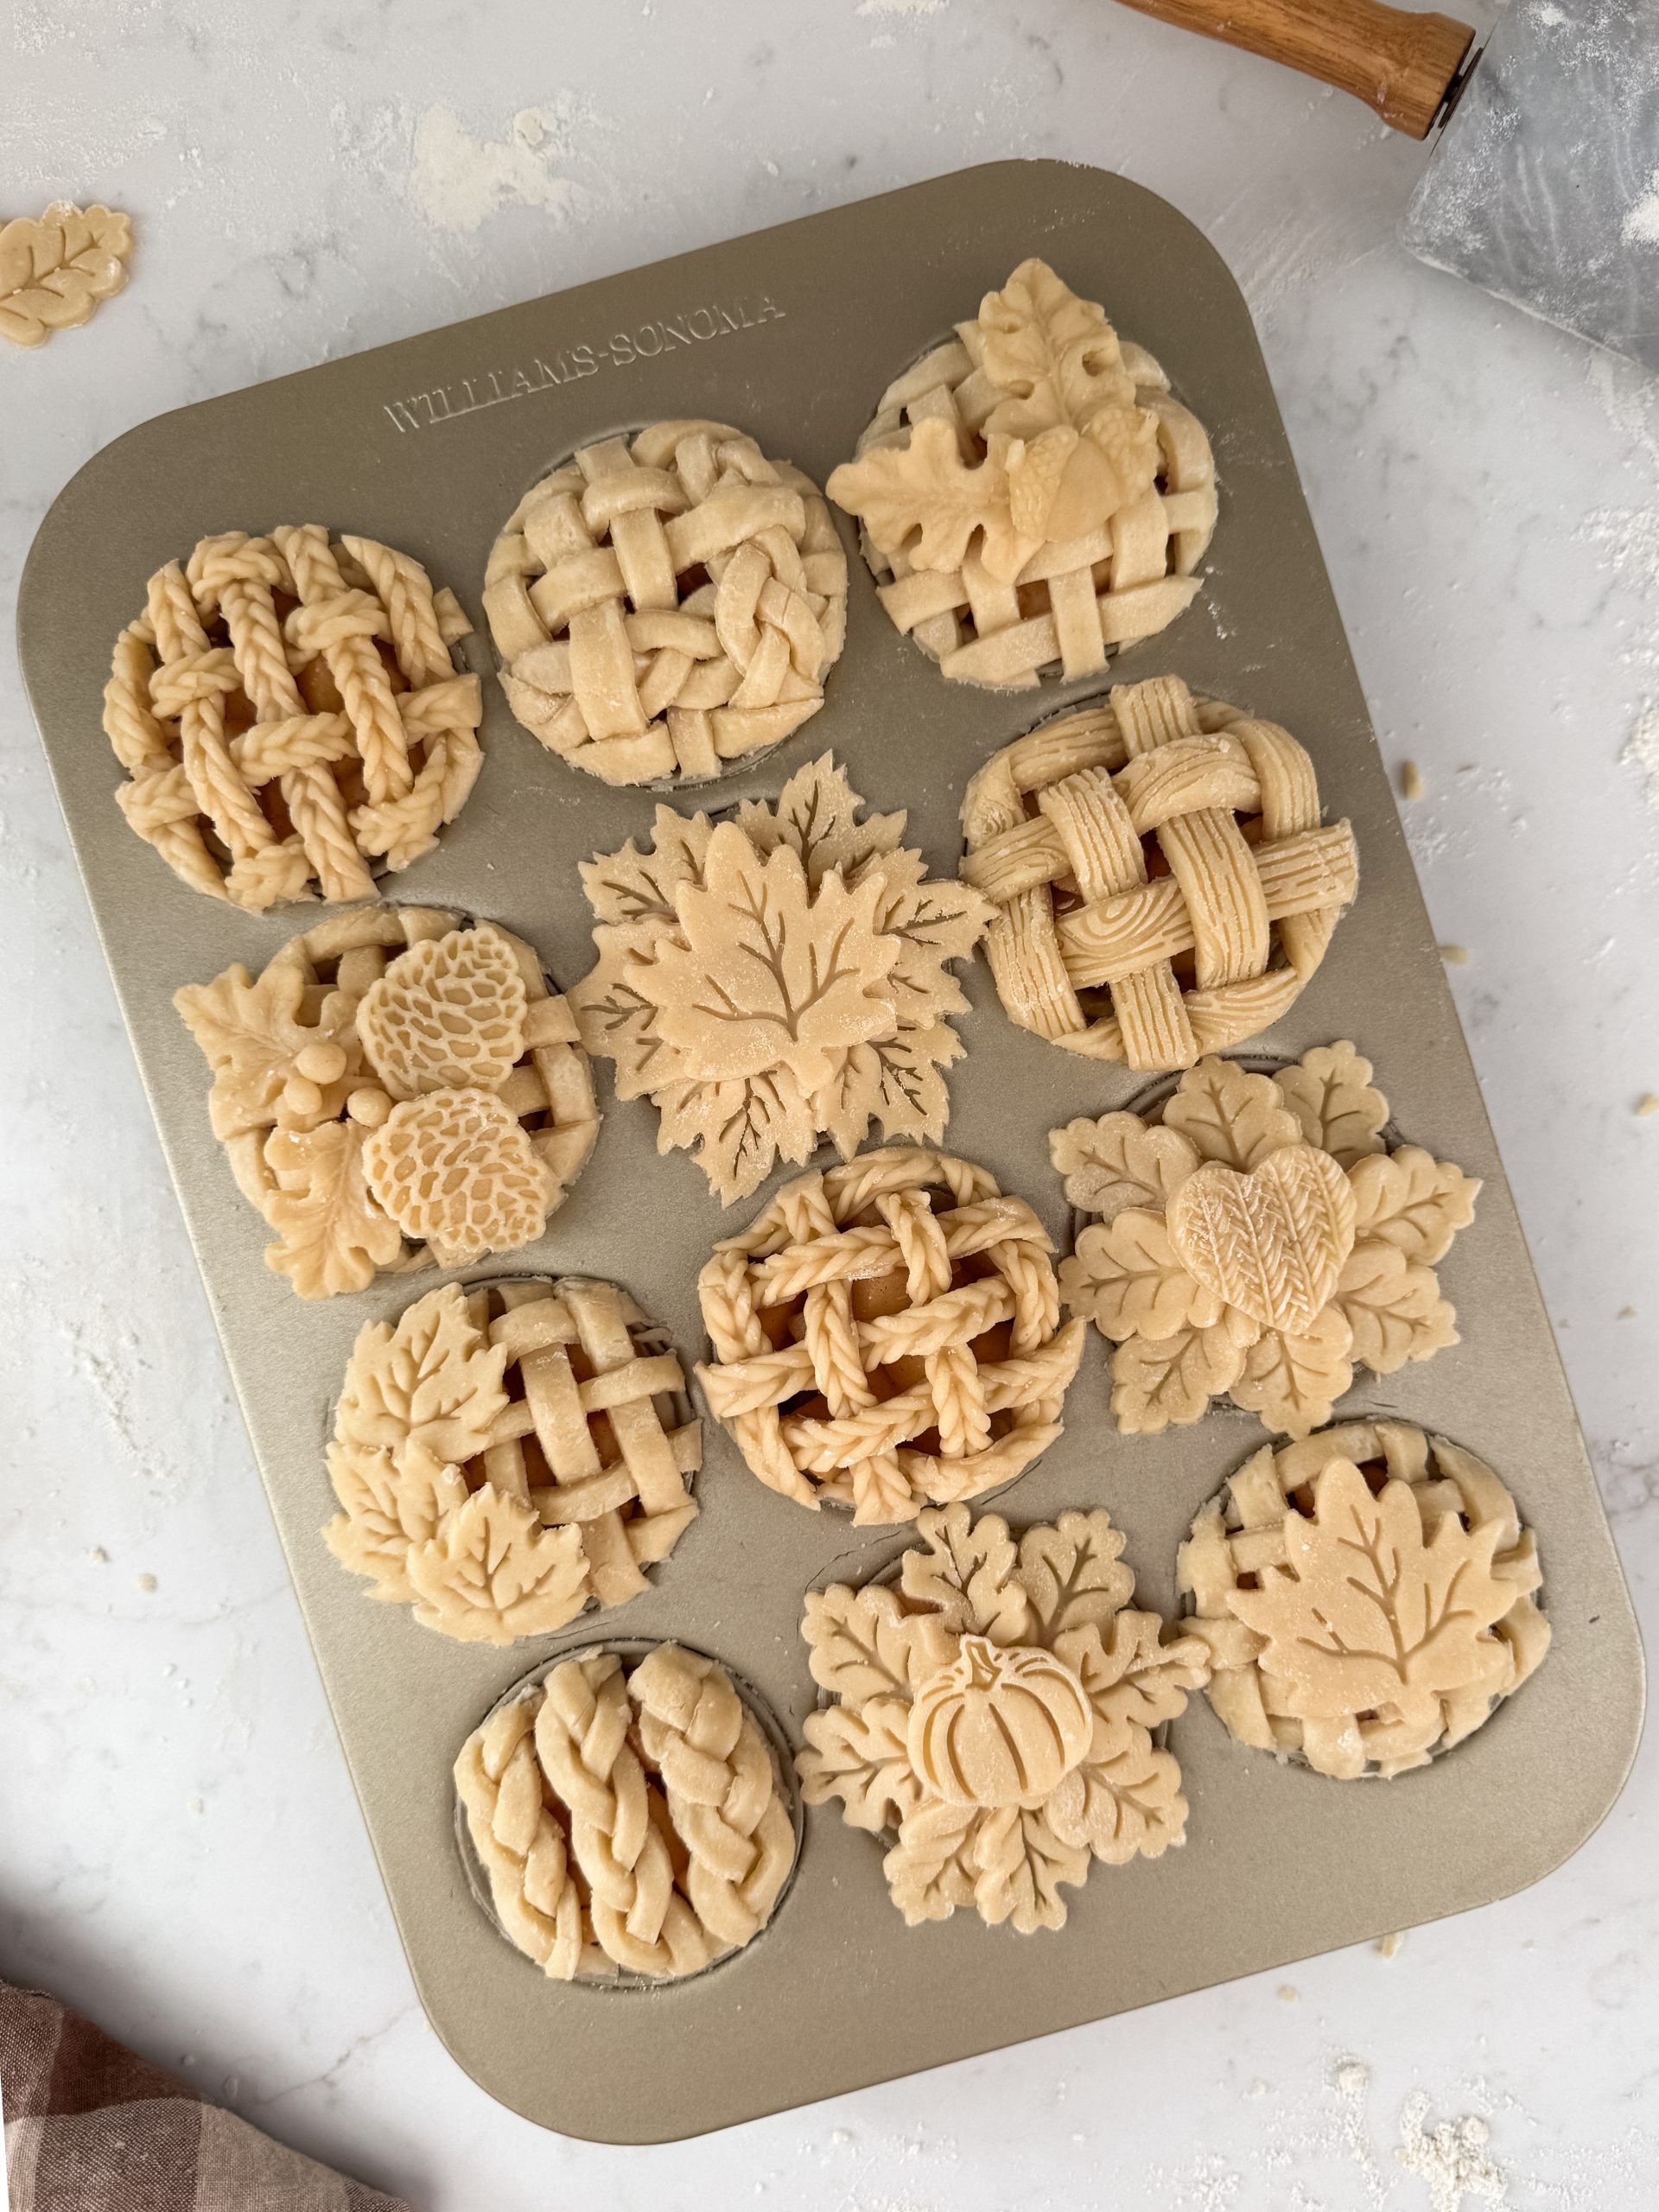
This was my first attempt at fall inspired mini pies and I absolutely love how they turned out!

The above photo is from 2018. The below photo of Autumn inspired mini pies are from 2025. My skills have definitely gotten better.
Tip 1: I always spray the cavities of the muffin tin before adding the pie crust. I personally like Baker’s Joy brand of baking spray.

Tip 2: I don’t use cupcake liners or parchment paper, but I did see THIS trick on Pinterest where someone cut strips of parchment paper to use as handles to remove the mini pies and THIS trick with foil. They both seem like good ideas, but I personally have not tried either. I still recommend cutting around each pie with a knife to ensure they come out in one piece even if you try either of these techniques.
Tip 3: Pie cutters and silicone molds! I have been purchasing pie cutters man’s molds for years and now have a pretty large collection. I have purchased them from Williams Sonoma, Crate & Barrel, & Amazon. If you are looking on Amazon you can type “Fondant Cutters” or “Pie Crust Cutters” into the search menu and tons will pop up. I also provided the direct links to my favorite pie cutters. For the pie cutter that are no longer available I linked identical sets.
The exact set of Autumn pie cutters I used for the mini pies photographed below are no longer available, but THESE from Williams Sonoma are identical to the ones I originally bought. I also found THESE Autumn pie cutters that are very similar to the ones I have.

For Halloween, I found THESE on Amazon. I’ve used them several times and they work exactly as expected.
The exact Christmas pie cutter set I is no longer available at Williams Sonoma, but I did find replicas of them HERE and HERE. Side note, do you see a theme here? Williams Sonoma makes THE BEST pie cutters (IMO), which is why I always check their site first. They are truly great quality. Below is a picture of the Christmas mini pies I did in 2017.

For Spring, use THESE floral pie cutters. You might remember my Spring inspired mini pies that I made using the floral pie cutters.

Also, I recommend the muffin tin pictured below. It has become my go-to. You can check it out HERE.

Tip 4: I always top my pie crusts with an egg wash and sprinkle sugar in the raw on the tops. Simply whisk one egg and use a pastry brush to cover the top crust. It’s worth the effort. I get a lot of compliments on my crust recipe. It’s also a good way to take store-bought pie crust to the next level.

Tip 5: Cover the entire muffin tin with foil. Spray the side that will touch the pies with baking spray to prevent the top crust from sticking to the foil. Just in case you are wondering, as I started to put the foil over the muffin tin, I realized I hadn’t done the egg wash and sugar topping. I got a little over zealous while trying to make sure I took a picture of the sprayed foil.

Tip 6: Place the muffin tin on a cookie sheet to prevent any dripping onto the bottom of the oven. Because burnt pie crust that is stuck on the bottom of the oven is not fun to cleanup. You’ve been warned.

Tip 7: Bake the mini pies on 350° degrees for 25 minutes. Remove the foil, rotate the cookie sheet and bake for another 20-25 minutes or until the top crust is a golden brown.
Tip 8: To loosen the pies, I wait until they are completely cooled. It usually takes a couple of hours. For these mini pies specifically I didn’t cut them out until the next day. They were a lot easier to remove. But if you don’t have that kind of time, wait until they are completely cooled. Once the pies are cooled, I carefully use a sharp knife (think pairing knife) to cut around each pie. Carefully is the key word here. This takes patience. You definitely want to take your time to not cut into the pies, especially after you spent all that time making
For the filling, I used my simple apple pie recipe that was featured on Crate & Barrels Blog. They have since removed it. 😭 However, you can purchase my book, The Detailed Pie, for the recipe along with more tips and tricks to creating beautiful pies.

And that’s a wrap! I hope this post inspires you in your future baking adventures. I absolutely love to bake and sharing my tips with you. If you have any questions please comment below or DM me on Instagram. My handle is @acarriedaffairdesigns
Until next time. Xo
Shop This Post


38 Comments
Pat Hoffman
Absolutely stunning!!! Not really a ‘kitchen’ girl, but your baking has my head turning!!
Carrie
You are so kind! Thanks so much for the compliment and the laugh! 😂😂 I literally laughed out loud to the ‘kitchen girl’. Hope you have a wonderful evening!
Ana
Love, love.
Carrie
Thank you!
Kristen
This is amazing and I really would love to try this! What type of store bought pie crust do you think is the best? Thanks for the great post!
Carrie
Thanks so much!! I’m so glad you find it helpful. ❤️ I usually buy the store brand from Target or Walmart. Both work great!
Natalie Hawkins
These are just the cutest! Do you do anything special to attach the leaves or cutouts?
Carrie
Hi! Nope! I just lay them where I want to and they stay. ❤️ Thanks so much for the sweet comment too.
Harriet Powell
Thanks for the mini pie ideas. I make cakes and pies for holiday gifts. Mini changes the game for me
Jennifer Daniel
I just tried this for dinner at a friend’s house and it was a total hit! Good tips and tricks and decorating inspo 🙂 I was surprised at how well they turned out the first time and can’t wait to make them again!
Carrie
That’s so awesome!! I love seeing comments like this. ❤️❤️ So glad you found it helpful and that they turned out!
Katie Long
I’m very excited to try these! I want to try making mini pumpkin pies; would you recommend the same baking time?
Carrie
Yes I would! The bottom crust needs to cook through. 🤗
Sharon
Such a great idea! Thanks for sharing!
About how much pie filling in each pie?
Mona Jonex
Your mini pies are absolutely GORGEOUS!
Carrie
Thank you!!
Dux
Omg I just stumbled upon this when @pieladyreads made them in her post and said it was all your design! I love it!
Question about lattice design, etc under the stamps. Are you making those? Is that another stamp you can use that makes that design for you? Any tips are appreciated!
Carrie
Hi! Thanks so much for reaching out and the kind words. I make the lattices by hand. The trick is to spray a little bit of Pam around the edges before adding your lattice. This will prevent the top crust from sticking to the pan when you go to remove them. Allow a little overhang then use a precision blade (like a box cutter) that is food grade to cut the overhang off for the clean lines. Also, bake the stamp pieces separately for 10 minutes on 350°F. This will ensure the top crust is fully baked. After you take the mini pies out, let them cool then place the baked stamps on top. Doing this also keeps the integrity of your stamps so they look just as good baked as pre-baked. Hope that helps! Let me know if you need anything else. Good luck!
Deb
Any tricks for putting the bottom crust into the tins? How much bottom crust do you use for each pie?
Milly
So beautiful and so well explained. Thank you!
Carrie
Thank you so much! Glad you enjoyed it!
Michele
Hi Carrie, thanks so much for sharing. I have not used store bought pie dough in the past, perhaps it will hold its shape better than home made! Can you please tell me how thick the pie crust should be for mini pies? Thanks, Michele
Denise
What type of pie crust do you use. The one I have I can’t seem to do anything with, just plain old pies. It flaky and tasty but as soon as I try to work with it it falls apart. Not sue if I’m not adding enough water…to much or it just isn’t the right one to do lattice and flowers with.
Carrie
So for most of my designed pies I use store bought crust. It’s easier to handle with the designs. ❤️ I do have a yummy pie crust that I make from scratch. That recipe will be in my book coming out later this year. Hope that helps! Good luck!
Leila
You skipped the part where you explain how to get the crusts into the tins.
Amber
Could these be made ahead and frozen in large quantities for an event? If so, would you just thaw to room temp or heat in oven?
Carrie
Absolutely! I would take them directly from the freezer and put in the oven at 350º degrees for 20 minutes. Hope that helps. Thanks!
Becky Robertson
Carrie you really outdone yourself on these pie crust!!! I just happened to luck up on your page tonight and I’m sooo glad I did. These are absolutely beautiful!!! I can’t wait to try making these. Thank you SO MUCH Carrie for taking the time out of your day toput this out to share this with others. I appreciate your kindness for doing so. Have a great day. 😃
Carrie
You are so kind Becky! Thank you!
Paula Carroll
Hi! Love the mini pies. How did you make the roses on the spring pies? Would love to make them next spring.
Carrie
Hi! I used a 1 inch circle cookie cutter, cut out 5 circles, overlapped them slightly, then rolled them up. I then shaped them and bent the edges out to mimic a rose. Hope that helps. Good luck!
Camille Teel
Beautiful! I haven’t done minis in muffin pan yet. Just wondering..how do you get them out? Cooling rack on top and tip over? I’ll probably try strips but wondering how you do it.
Carrie
I let them cool completely (a couple hours) then use a knife to give me leverage to pull out in one piece. It takes a lot of patience.
Paula Carroll
Hi! I love the mini pies and would love to know how you made the roses on the spring pies.
KRISTIE Douglass
I love these and I want to try to make them, although I feel a bit intimidated. I am worried of messing them up either by not cooking them right or when taking them out. I think freezing would be a great idea so then they can be made ahead of time or given to family at holidays. Thank you for sharing this wonderful post and all your information!!
Kris
Terry Proctor
Hi, Love these ! Just bought some stamps and had planned to try them out on full-size pies but the idea of mini pies is perfect for Thanksgiving with SO many desserts to sample ! But I’m confused by something you said in your Oct 10th response to “DUX” when you were talking about stamps that go on top of the lattice. You mention baking the stamps separately for 10 minutes and placing on the pies after they are cooled to insure the crust gets thoroughly baked. But all of your photos show the stamps on top of lattice, brushed with egg and sugar – seemingly ready to cover with foil and go in the oven.
Carrie
I have done both. 🙂 The more I bake, the more I learn. With doing both, I prefer to bake the stamps separately for 2 reasons 1) I can ensure the pie crust is completely baked and 2) I can control the browning by baking them separately. I bake them separately then decorate the top crust afterwards. A lot of the times I post a pre-baked pie crust fully decorated, I usually remove all the pieces after I photograph the pie, then bake separately. Hope that helps! Sorry for the delay. ❤️
Ann
How do the baked stamps stay on the pies after baking? Do you attach them with something? Planning a wedding with pies. Thanks